 Priyanshu Kayarkar
Understanding Claude Code by Building It (in ~200 Lines of Code)
Motivation
We have all used Claude Code, Gemini CLI (now called Antigravity CLI), and other coding agents, whether they are terminal-based or GUI-based. But have you ever wondered how they work under the hood?
The best way to understand anything is to build it, so I started learning how AI agents work and began building a simpler version of complex AI agents like Claude Code.
In this blog, we will build a simple AI agent ZenCode. It can access our filesystem and perform operations on it (for this part of series).
AI Jargon : Key Concepts
Before understanding the inner workings of our AI agent, we need to understand a few terminologies.
Token
Technically, computers don't understand text or any other form of human-readable data. Before an LLM can process data, it converts the text into tokens, and each token is assigned a number.
// For example
"Hello World"
       ↓
["Hello", "World", "!"]  ← Tokens
       ↓
[15496, 995, 0]          ← Token IDs
LLM
I think we have all heard about it by now, but anyway... An LLM (Large Language Model) is a program trained on massive amounts of text data (usually from the internet) to predict the next token in a sequence.
System Prompt
A system prompt is a set of instructions given to an LLM before the conversation begins. It decides the overall behavior of the AI.
Agent
Basically, an agent is a software program that can:
- Receive a goal
- Decide what actions to take to achieve that goal
- Use tools (APIs, databases, web browsers, code execution, etc.)
- Observe the results and take additional actions on its own
Tools
Tools are a way for the LLM to interact with systems outside of its own neural network. Examples of tools can be:
- Create/Read files in our system
- Search the web
- Query a database
- Run code
- Call APIs
With tools, we can make our AI "book a flight ticket," "generate code," "do research from the internet," "send emails," etc. Without tools, an LLM can only generate text based on its training data.
Architecture of Our AI Agent
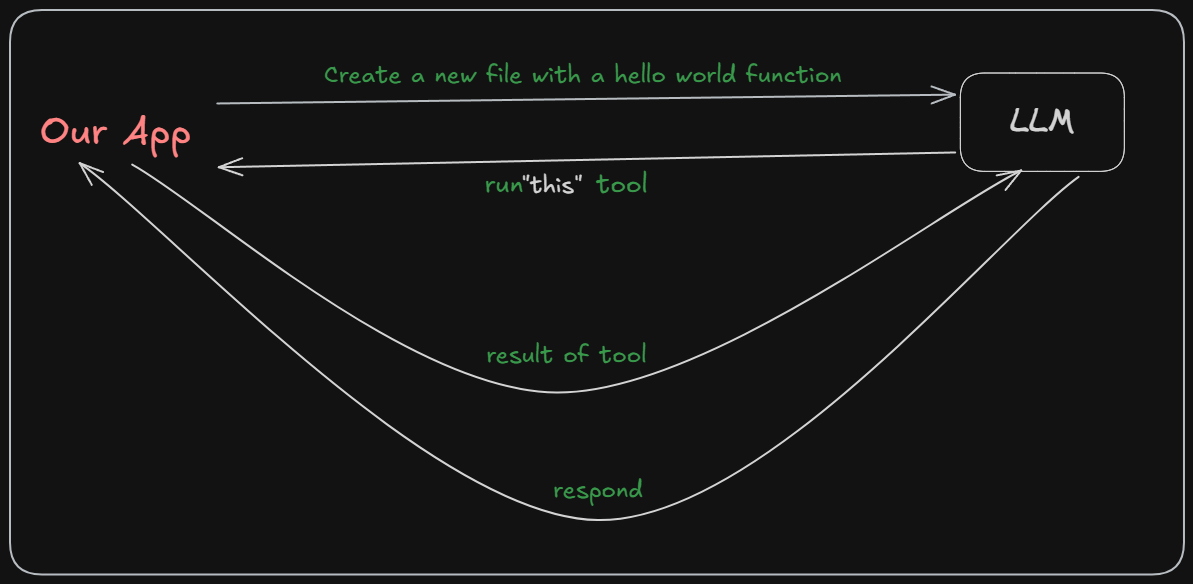
How It Works
- You send a message: "Create a new JavaScript file with a hello world function."
- The LLM decides it needs a tool and responds with a tool call (e.g., "run create file tool").
- Your program executes that tool call locally.
- The result is sent back to the LLM.
- The LLM continues reasoning and responds with another tool call to write text content into that file.
- Your program executes the tool again, inserting the data the LLM provided.
- This process continues until the goal is completed.
NOTE: It's just a loop. The LLM never actually touches your filesystem. It simply asks your program to execute tools, and those tools are responsible for accessing the files.
So let's jump into VS Code and start building.
Setting Up the Project
Packages We Are Going to Use
- Bun - A JavaScript runtime. You can use Node.js or Deno as well, but I recommend Bun because it provides many useful things out of the box.
- Gemini AI - We will use Gemini as our LLM provider because it's free and gets the job done. You can easily swap this for any other provider.
Initialize the project:
bun init
Select a Blank project. Then, install the Google AI SDK for Node.js:
bun add @google/genai
Now we will do some basic imports and set up the API client inside index.ts:
import fs from "node:fs";
import path from "node:path";
import { type FunctionDeclaration, GoogleGenAI, Type } from "@google/genai";
Create a .env file to store your Gemini API key, which you can get from Google AI Studio:
GEMINI_API_KEY=XXXXXXXXXXXXXXXXXXXX
Next, initialize the Gemini AI client:
const ai = new GoogleGenAI({
  apiKey: Bun.env.GEMINI_API_KEY,
});
We will also create a utility function to resolve file paths. This function takes a filename as input. If the file doesn't already exist, it creates it automatically and then returns the absolute path.
const resolvePath = (filename: string): string => {
  const filepath = path.join(path.resolve(), "/data", filename);

  if (!fs.existsSync(filepath)) {
    fs.writeFileSync(filepath, "", "utf-8");
  }

  return filepath;
};
Building the Tools
Our AI agent only needs three tools:
- Read files - So the LLM can see file contents
- List files - So it can navigate through our codebase
- Write files - So that it can modify files
NOTE: Production grade agents have many more tools to execute like bash commands, query databases, or search the web but for our use case, these three are sufficient.
Tool 1: Read Files
This is the simplest one. It takes a filename and returns its content.
We pass an args object containing the filename, and we return the content of the file along with its path.
I created a TOOL_REGISTRY object to store and access our tools efficiently.
Will add the remaining two tools inside this object as well.
const TOOL_REGISTRY = {
    "read_files": (args: { filename: string }) => {
        const filePath = resolvePath(args.filename);
        const content = fs.readFileSync(filePath).toString();
        return { filePath, content };
    },
Tool 2: List Files
This tool takes a path and lists all the files and directories inside it as an array. I restricted the LLM to make changes inside the data folder only, which is why I haven't passed any path parameters by default, it will look at our /data directory.
    "list_files": () => {
        const fullPath = path.join(path.resolve(), "/data");
        if (!fs.existsSync(fullPath)) return [];

        return fs.readdirSync(fullPath).map((filename) => {
            const filePath = path.join(fullPath, filename);
            return {
                filePath,
                type: fs.lstatSync(filePath).isDirectory() ? "dir" : "file"
            };
        });
    },
Tool 3: Write Files
This tool takes a filename and newContent to be written into that file.
    "write_files": (args: { filename: string, newContent: string }) => {
        const filePath = resolvePath(args.filename);
        try {
            fs.writeFileSync(filePath, args.newContent);
            return { path: filePath, action: "edited" };
        } catch (err) {
            console.error(err);
            return { path: filePath, action: "failed" };
        }
    }
} as const;
Creating Function Declarations
The Google GenAI SDK provides a FunctionDeclaration type where we define metadata about our tools, like the name, description, and parameters. This helps the LLM understand exactly what each tool does and when to use it.
Tool Declarations
Here we define the name, a short description, and specify the parameters using Type.OBJECT. We also use the required array to tell the LLM which arguments it must provide to execute the tool.
const readFilesDeclaration: FunctionDeclaration = {
  name: "read_files",
  description:
    "Gets the full content of a file provided by the user within the data directory.",
  parameters: {
    type: Type.OBJECT,
    properties: {
      filename: {
        type: Type.STRING,
        description: "The name of the file to read (e.g., 'index.ts').",
      },
    },
    required: ["filename"],
  },
};

const listFilesDeclaration: FunctionDeclaration = {
  name: "list_files",
  description:
    "Lists all files and directories inside the root default /data directory.",
  parameters: {
    type: Type.OBJECT,
    properties: {},
  },
};

const writeFilesDeclaration: FunctionDeclaration = {
  name: "write_files",
  description:
    "Overwrites or creates a file inside the data directory with new content.",
  parameters: {
    type: Type.OBJECT,
    properties: {
      filename: {
        type: Type.STRING,
        description: "The target filename to create or modify.",
      },
      newContent: {
        type: Type.STRING,
        description: "The full text content to write into the file.",
      },
    },
    required: ["filename", "newContent"],
  },
};
Just like we created the TOOL_REGISTRY to store our tools functions, we will create a geminiToolsConfig array to pass our declarations to the LLM.
const geminiToolsConfig = [
  {
    functionDeclarations: [
      readFilesDeclaration,
      listFilesDeclaration,
      writeFilesDeclaration,
    ],
  },
];
Connecting Tools to Gemini
Now comes the final part: taking user input and passing it to our LLM along with our tools. First, we need a system prompt to give the model context about its role.
const SYSTEM_PROMPT = `You are an expert coding assistant tasked with solving software engineering issues.
You have direct access to the workspace files through your provided tools.
Analyze the user request, explore the file tree using your tools, and make modifications if necessary to complete the task.`;
NOTE: you can change the system prompt as you want but it works for our usecase.
Building the Agent Loop
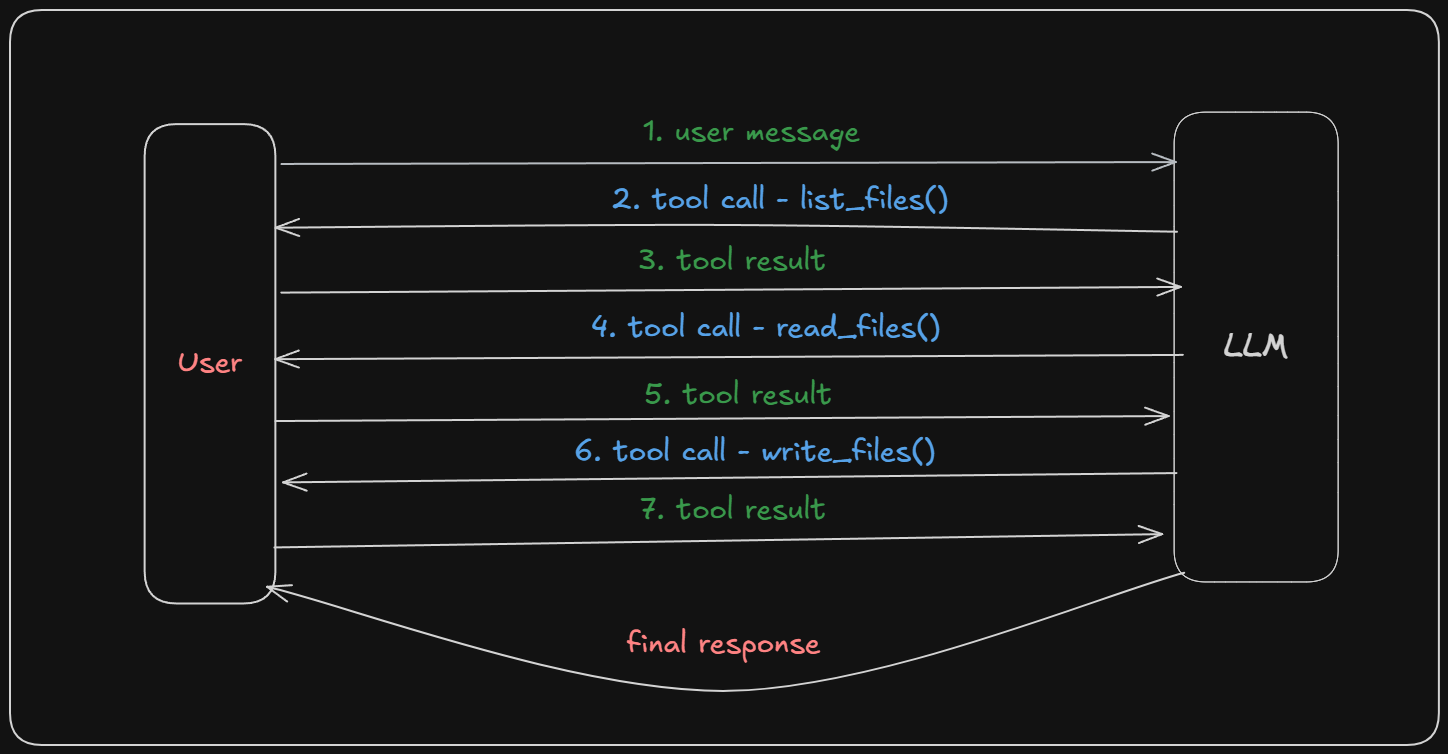
Now we will create a runCodingAssistant function. First, we need a contents array. This is important because it acts as the conversation history between the user, the LLM, and the tools.
One important thing to understand is that AI agents are not a single request-response cycle. The model may call a tool, inspect the result, call another tool, inspect that result, and continue this process until it has enough information to solve the task (as we have discussed in the Architecture section). That's why we wrap our logic in a while(true) loop.
async function runCodingAssistant(userMessage: string) {
  const contents: any[] = [
    {
      role: "user",
      parts: [{ text: userMessage }],
    },
  ];

  try {
    while (true) {
      const response = await ai.models.generateContent({
        model: "gemini-3.1-flash-lite",
        contents,
        config: {
          systemInstruction: SYSTEM_PROMPT,
          tools: geminiToolsConfig,
        },
      });

      const functionCalls = response.functionCalls;

      // If there are no function calls, the model is done!
      if (!functionCalls || functionCalls.length === 0) {
        return response.text;
      }

      // Add the model's function call message (preserving all original parts like thought_signatures)
      const modelContent = response.candidates?.[0]?.content;
      if (!modelContent?.parts) {
        throw new Error("Model response does not contain content parts.");
      }

      contents.push({
        role: "model",
        parts: modelContent.parts,
      });

      // Execute every tool call
      const responseParts: any[] = [];
      for (const call of functionCalls) {
        const toolName = call.name as keyof typeof TOOL_REGISTRY;

        if (!TOOL_REGISTRY[toolName]) {
          throw new Error(`Unknown tool: ${toolName}`);
        }

        const result = await TOOL_REGISTRY[toolName](call.args);

        responseParts.push({
          functionResponse: {
            name: call.name,
            response:
              typeof result === "object" &&
              result !== null &&
              !Array.isArray(result)
                ? result
                : { result },
          },
        });
      }

      // Send tool result back to LLM
      contents.push({
        role: "user",
        parts: responseParts,
      });
    }
  } catch (error) {
    console.error(error);
    throw error;
  }
}
When we execute a tool, we must send the result back to the LLM. Without this step, the model can call a tool but can never actually see its output. By pushing the functionResponse back into the contents array, the LLM can analyze the tool output and decide its next move.
Testing It Out
Note: For now, we haven't built a UI for it, so we will call the function manually and pass the user message directly from the code.
runCodingAssistant(
  "Create three python files where solve the two sum in different ways",
);
Run it using the terminal:
bun index.ts
Output:
Conclusion
Congratulations! You have built your first AI agent in under 180 lines of code.
This is obviously a much simpler version of modern coding agents like Claude Code and Gemini CLI, but it helps us understand the core concepts.
In the next part, we will continue improving it and make it more practical.
Try It Yourself
The full source is around 200 lines of code. Feel free to swap out any language of your choice, LLM provider, or system prompt and add more tools on your own!
Thank You 🤍